Friday 9 December 2011
ANIMATING scene 1, 3 and 4
I have started scene 1 working with jack and scene 3 and 4 with steve. I have then written more detail on the group blog and the link are here - http://finchingfielddesign.blogspot.com/2011/12/group-animating.html
Thursday 8 December 2011
Morpher fire
Morpher the new technique learn from this year and I have try to use it in the animation, so fire would be a good place to start. So create a plane and assign a fire material on it. Boarder selection are selected to hold down shift and drag out new polygons. Vertices mode are then used to change the shape.
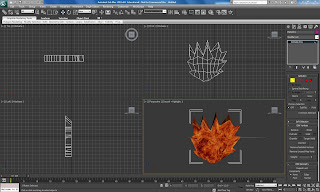
Hold down shift and drag two more fires out and change the shape of the new fire. At the original fire apply morpher and pick the two fires in the scene.
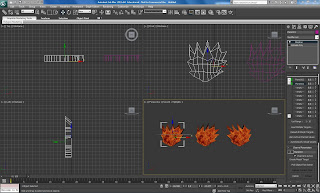
Import all three flames to the scene inside the fire place and use auto key to change the shape of the fire just by moving the value of the object.

Human


Many thanks to Stephen very very kind offer for his head and hand models. Have save me the time to remake them for my human body model.


Using a human body reference image as a guide, a box is created and converted to editable poly. Using vertex selection and polygon selection to change the shape of the box to match the image body shape and extrude any extra part like the legs and arms.

The hand and head is then imported to the scene and by matching the vertex using swift loop, the heads and head is then attached and welded to the body.


Use the material ID's to set the ID's to the body and use multi/sub object to assign different material on the body.

Biped

The biped is then applied to the body and using physique to link the biped and body together, then using envelope to make sure all the body part are link to the biped.
Redo Hand
After looking the body in the scene, the owner of the hands decided, the hands don't look good enough, so I went back to the model and redo the hands and I have also use Unwarp UVW to create a more realist hand by using the owner real hand skin texture for the material, just like what people did for creating the head.


Library table

Using the reference image, create an box and convert it to editable poly, use polygon selection to extrude the faces inward and assign a wood bitmap material to the table.


Cooker and fridge

New techniques: Taper and Bend.
The handle are create by an box, to test out new techniques from the modifier, I have found Taper and Bend became very useful for creating the shape of the handle.
Taper

Bend

The body is created using an box and by converted to editable poly i can add or move the vertex around, inorder to set the material ID's.

When the material ID's is set, apply Unwarp UVW to map the bitmap cooker picture to the box.

Fridge
Using the reference image as a guide, create and convert the box to editable poly, vertex mode are selected to move the vertex are around.

Use polygon selection to extrude a new set of polygon, for the fridge doors.


Pencil and rubber


The body of the pencil is made by using a 6 sides cylinder converted to editable poly and the cone is used for the end of the pencil, then attach them together. Material ID is used for the end of the pencil to create a wood and lead effect.
Rubber

The rubber is created using an box, converted to editable poly and simply using vertex mode to change the shape, turbosmooth and a white material is then applied to the model.
Outside

New Technique: Noise, UVW mapping and tile mapping.
Grass
A plane is created from the top view and apply new technique Noise to the plane to create a uneven surface.

Grave stone
Grave stone is then created by using box and converted to editable poly, vertex mood is then selected to change the shape of the box. Smoothing groups is then used to create different shape of grave.

Un warp UVW are then applied to map out the texture.

Stone path
The stone path is then created from a plane with the stone texture, however the bitmap look repeat it self, when assigned to the plane, so I have use Photoshop to edit the bitmap, by cut it in half and join it by top to bottom, then path them together and repeat it to left to right. This is new technique of tile mapping.

Red lion
Next is the pub opposite the guildhall. Import the red lion image in 3d max and assign it to an plane.

Convert the plane to editable poly, new technique UVW mapping is applied to the plane. Swift loop and vertex mode is selected to remove extra information in the image. Boarder mode is then selected all the edge around the plane. Hold down shift and drag the plane backward to create the depth.

To add the depth for the window and door, polygon mode is then selected and extrude inward.

Apply Unwarp UVW and map the texture that has been stretched.

Road
The last models I need for the outside scene are the road, but the road I found doesn't match what I wanted, so I open the image in Photoshop and add two yellow lines next to it.

Create an plane and assign the image to the model.

Subscribe to:
Posts (Atom)